Zanahorias Rostizadas with coriander aioli and pistachio dukkah
This is a re-creation of an unexpectedly delicious appetizer from Terras Urban Kitchen in Brownsville, Texas. Smoky carrots with a floral-citrus sauce and crunchy spiced topping. I don’t know if anyone at that ladies night remembers their entrée well, but we ALL remember these carrots!!
Naptime tip: Make it all in advance! Reheat the carrots when ready to serve, and chop the cilantro last minute.
Terras Roasted Carrots
Serves 10-12 as an appetizer, 6-8 as a main.
Ingredients-
3-4 lbs. whole carrots
2 Tbs. Olive oil
Salt
For the aioli-
1/2 cup kewpie Mayo (or regular Mayo with 1/4 tsp. Accent seasoning
Zest of 2 limes
2-3 Tbs. lime juice
2 1/2 tsp. ground coriander
1/4 tsp. Onion powder
1/4 tsp. Garlic powder
1/4 tsp. Salt
For the dukkah-
1/4 cup dry roasted pistachios, chopped
1 tsp. Sesame seeds
A dash more coriander and salt
2 Tbs. Chopped fresh cilantro
Method-
Heat the oven to 400°F. Peel all the carrots, spliting the biggest ones in half the long way. Toss the carrots in the olive oil, lay them straight on 2 sheet pans and season with salt.
Roast in the oven for 30 minutes, or until carrots are tender.
While carrots are roasting, make the aioli. Stir together the mayo, lime zest, juice and spices. Taste and add more juice or salt as needed. Cover and refrigerate until ready to serve.
Next stir together the nuts and seeds for the dukkah, adding a little more coriander and salt. Set aside.
Once carrots are soft, but not limp, broil one pan at a time for 2-5 minutes until carrots are moderately charred.
To serve, lay all the carrots straight on a serving platter and drizzle with the aioli. Sprinkle on the dukkah topping and garnish with the chopped cilantro. Enjoy!
This recipe came from my husband who learned it on his mission to British Colombia. He asked a lady in his area, who ran an Indian restaurant to teach he and his companion how to make Butter Chicken. She showed them how to add a little this, a lotta that and don’t forget to kiss your hand as you add the salt so your dish won’t be too salty. I fell in love with this curry when my husband would make it, but NEEDED a real recipe I could duplicate. So I finally quantified all those “little of this” bits and wrote it down. And it’s soooooo good. The butter quantity is correct, this is definitely a sometimes food. But it’s so worth it.
Butter chicken Serves 4-5
Ingredients:
1 cup butter 1 lb boneless, skinless chicken 1 diced onion 3 cloves minced garlic 2 tsp grated ginger 1/2 tsp red chili flakes (or more for extra heat!) 2 tsp garam masala 1 tsp turmeric 1 tsp paprika 1 tsp cumin 1 tsp salt 1 14.5 oz can crushed tomatoes 1/2 cup heavy cream 1 tsp kasoori methi (Fenugreek leaves) Basmati or jasmine rice, to serve Naan, to serve
Directions:
Melt butter in large sauté pan over medium heat. Wait until butter just starts to brown, then add the chicken. Cook chicken in butter then remove chicken from pan and set aside. Add the onion to the pan and cook until translucent and starting to brown, 5-8 minutes.
Add garlic, ginger and chili flakes, sauté about 30 seconds. Add spices and salt and cook until fragrant, turning down heat, if needed. Pour in crushed tomatoes and simmer 10 minutes.
Remove sauce from heat and use an immersion blender to blend until smooth. Or carefully pour sauce into a blender and purée until smooth. Return sauce and cooked chicken to the pan and heat until chicken is warm. Remove from the heat and stir in cream and kasoori methi. Add salt if needed. Serve hot with rice and naan.
Named for the country’s capital city, Kiev cake is a classic Ukrainian dessert. Two crunchy layers of hazelnut dacquoise, filled and iced with creamy rum and chocolate-flavored German buttercreams. And if you haven’t heard of or had a German-style buttercream, it’s basically a custard-based frosting. It’s not difficult, and the result is a buttery, rich filling that is a dream to spread and pipe.
Now, this cake is definitely decadent and a bit of a time intensive dessert (albeit mostly bake time), but it is perfect for a celebration. Also, it can easily be made gluten-free and is assembled in stages. Plus, it’s a great make-ahead, it is best made a day or 2 in advance. So let’s do it!
Naptime Tip: You can chill the custard base until ready to move on, just bring it back to room temperature before adding the butter. If your buttercream happens to split, let the bowl warm up to room temp, and beat the mixture again until silky smooth.
Kiev Cake
Recipe slightly adapted from Simply Homecooked. Serves 12-16. 355-266 cal/slice.
Ingredients:
For the dacquoise/meringues-
1/3 cup AP or GF flour
1/3 cup sugar (for the nut mixture)
1 1/2 cups toasted hazelnuts, chopped
8 egg whites, room temperature
1 1/2 cups sugar (for meringue)
1/4 tsp. cream of tartar
1/2 tsp. vanilla extract
For the buttercream-
2 eggs
1 1/4 cups sugar
1 Tbs. corn starch
1/4 tsp. salt
1 cup milk
1 tsp. vanilla extract
1 1/2 cups softened butter (3 sticks)
1 tsp. rum flavoring
1/4 cup cocoa powder
Method:
Preheat oven to 300℉. Trace a 9 inch circle on 2 sheets of parchment paper. Set aside.
In a medium bowl, combine the flour, 1/3 cup sugar and chopped hazelnuts. Stir to combine.
Next, pour the egg whites into the bowl of a stand mixer. Beat on low for 30 seconds, then increase speed to medium and whip until foamy. Add the cream of tartar, then continue to beat until soft peaks form.
Then, slowly add 1 1/2 cups of sugar over the next 5 minutes, beating until stiff peaks form. Finally, add the vanilla and beat until incorporated, about 10 seconds.
Gently fold in the hazelnut mixture.
Dab 4 dots of the meringue onto the corners of 2 baking sheets (to glue down your template.) Place prepared parchment paper onto sheet pan, traced side down.
Divide the meringue evenly amongst the two 9 inch circles. Spread meringue into a flat round, staying within your traced lines. Bake at 300℉ for 10 minutes, then lower the oven to 220℉. Bake for another 3 hours and 45 minutes, rotate pans halfway through.
Meanwhile, start the buttercream. In a medium bowl, beat the eggs with the 1 1/4 cup sugar, corn starch and salt.
Then, in a medium saucepan, heat the milk over medium high heat until simmering. Remove from heat and drizzle the milk into the egg mixture, stirring constantly to temper.
Pour the custard back into the saucepan and cook over medium low heat, whisking frequently, until it becomes yellow and thickened. This may take 5-10 minutes.
Once thickened, stir in vanilla and pour into a bowl to cool to room temperature. (This can be covered and refrigerated at this point for later use. Bring back to room temperature before adding butter.)
When meringues are finished baking, remove from the oven, peel off parchment and cool completely on wire racks. Once cooled, gently place a 9 inch round cake pan on top of each round, with a baking sheet underneath. Cut around the cake pan to create 2, 9 inch dacquoise rounds. Gather the off-cuts and blitz or crush into coarse crumbs to coat the finished cake sides.
In another bowl or stand mixer, whipped the softened butter until smooth. Pour in the cooled custard and rum flavoring. Beat until thick and creamy.
Remove about 1/3 cup of the rum buttercream and place in 1-2 piping bags (one for lines, one for rosettes). Remove another 1 1/2 cups of the remaining buttercream and add to another bowl along with the cocoa powder. Beat to combine. You should now have white buttercream for filling a piping, and chocolate buttercream for topping the cake.
Dot your cake stand with a little buttercream to secure cake in place then set 1 dacquoise round on the cake stand, covering the edges of the cake plate as desired to keep it clean. (Cake is quite sturdy and can easily be transferred from decorating stand to serving stand, if needed.)
Spread the white buttercream evenly on top of the first meringue layer, going all the way to the edges, even a little over.
Place the second meringue layer on top of the buttercream. Coat the top of the cake with the chocolate buttercream, pushing it all the way to the edge and slightly over. Spread enough buttercream to thinly coat the sides of the cake. (The sides will be covered with crumbs, so the buttercream colors can mix.)
With small handfuls of crumbs, carefully coat the sides of the cake with the leftover meringue crumbles. (You may want to have your baking sheet under the cake/stand to catch the fallen crumbs.)
Pipe a diagonal crosshatch on the top of the cake to decorate, adding rosettes along the edge as desired. Refrigerate overnight or up to 3 days. Bring to room temperature before slicing and serving.
This is a delightfully creamy bowl of goodness hailing from Sao Tome and Principe, but it’s also enjoyed in other countries including Brazil. Canjica is essentially a rice pudding, but with hominy instead of rice. I LOVE hominy but had never thought to have it sweet. Traditionally, this is made from dry hominy that must be soaked overnight and cooked slowly for several hours. This is a speedy, but also delicious version that used canned hominy. Most traditional recipes finish this homey dish with a sprinkling of cinnamon, but we love the added texture from toasted coconut. Intrigued? Try it! I know you’ll love it.
Naptime Tip: This is actually a great treat to whip up last minute using simple fridge and pantry ingredients. It can even double as a cozy breakfast!
1 29.5 oz. can white hominy (also called green corn), drained
1/2 cup toasted coconut, for topping
ground cinnamon, for topping if desired
Method:
In a medium saucepan, bring water, sugar, salt, coconut milk and cinnamon to a boil. In a large bowl, beat eggs until well mixed. Remove pan from heat and slowly pour into eggs, whisking constantly. Add drained hominy. Return mixture to the pan and heat over medium low heat, stirring constantly until thickened. Do not boil. Remove cinnamon stick, if using. Serve into small bowls, sprinkling with toasted coconut and/or ground cinnamon. Enjoy warm.
Fresh fish is essential for ceviche. Trust me, I’ve tried to sub in frozen fish for convenience and the texture is no good. And for a deliciously vibrant version of ceviche, you MUST try Kodoka from Papua New Guinea. Sweet, sour, savory, with a variety of textures, this beautiful fish dish is as exciting to look at as it is to eat.
Naptime tip: Start the kokoda in the morning, stirring occasionally throughout the day and it’ll be ready for a refreshing lunch or dinner. Also, you can chop your melon and pepper a little earlier in the day to make for a super fast assembly at the end.
300g fresh, firm white fish filet such as cod, halibut or rockfish (bones and skin removed)
2 tsp. lemon zest (about 1 lemon)
1/4 cup or 60 ml fresh lemon juice
2 Tbs. or 30 ml coconut milk
Salt and black pepper to taste
1 red bell pepper
2 ripe tomatoes
8 ounces or 225g cantelope melon
1 Tbs. fresh basil, chopped
Method:
Cut the fish filet into 1/2 inch cubes then place into a non-reactive bowl (glass or plastic). Stir in lemon zest and juice. Cover the bowl and chill for 8 hours or up to overnight (ideally stirring several times.)
After 8 hours, drain any excess marinade from the fish. Stir in the coconut milk and season with salt and pepper. Next, dice the bell pepper and tomato into 1/4-1/2 inch cubes. Peel and seed the melon and dice into the same size. Add the veg and melon to the fish. Stir gently to combine and transfer to serving dish. Garnish with chopped basil and enjoy!
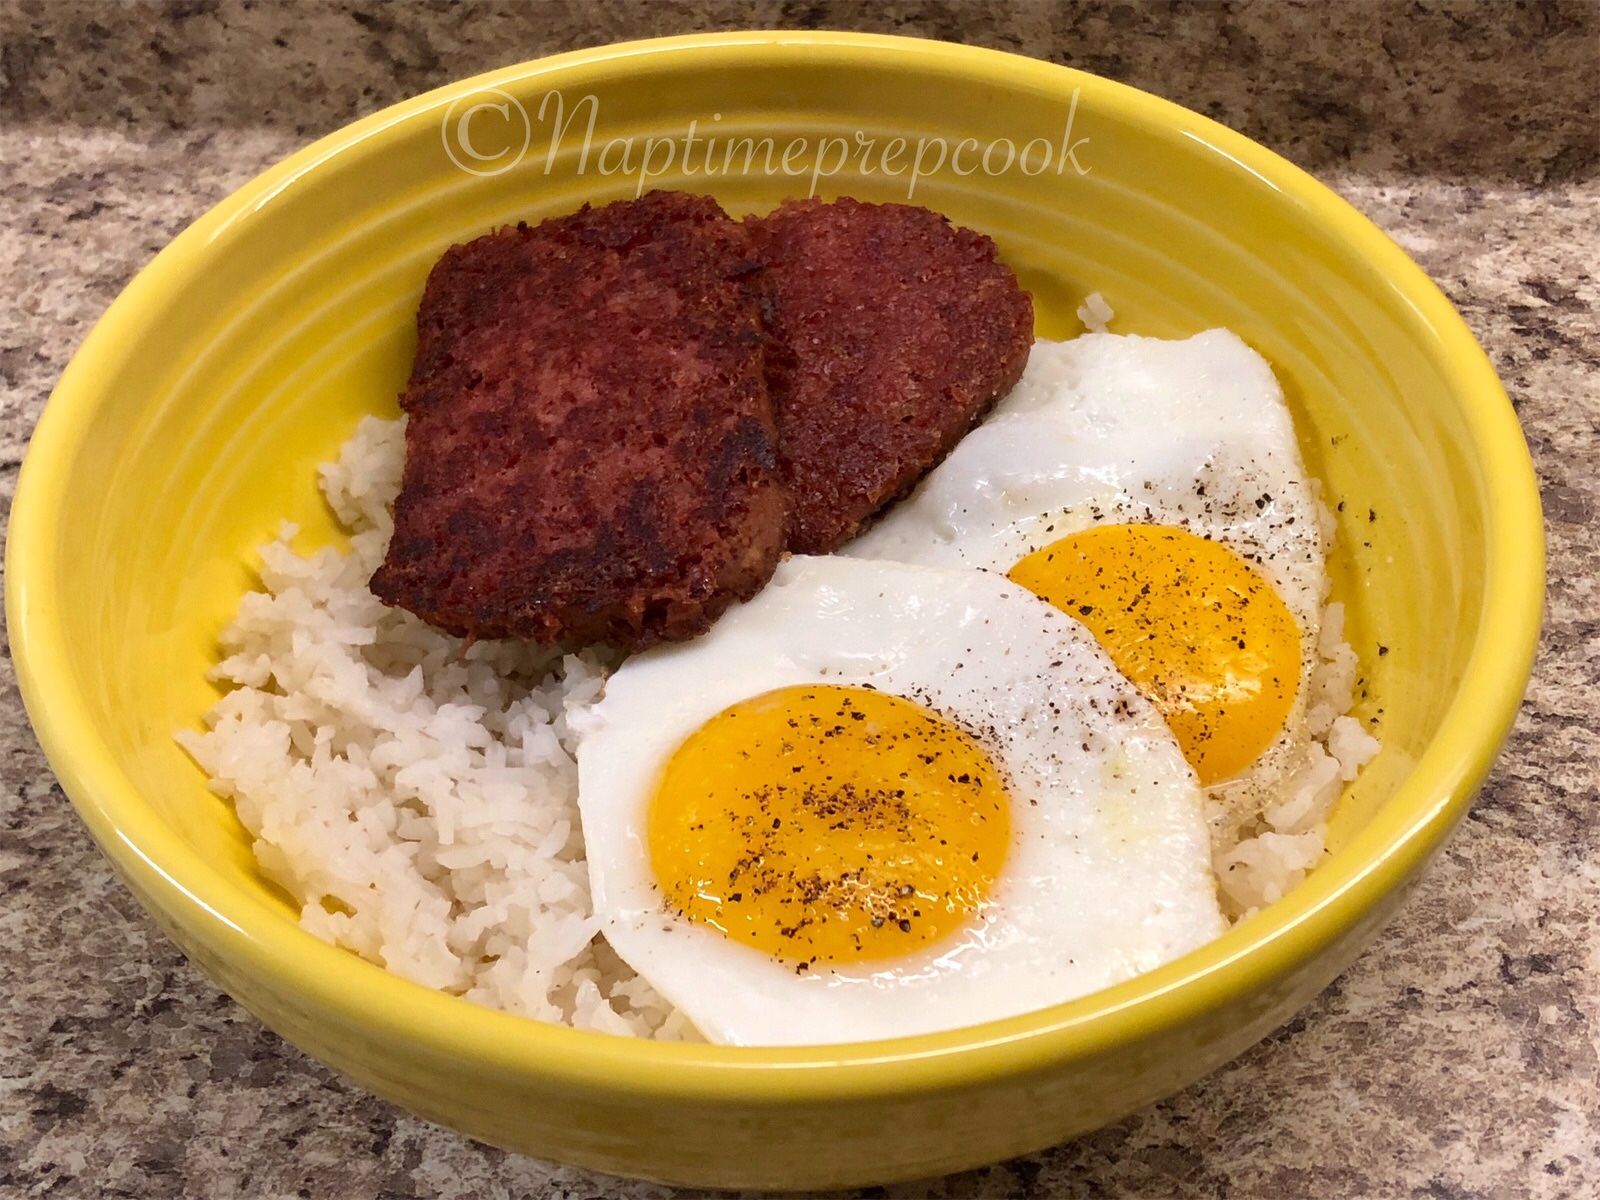
From my research, there is often not a lot of fresh food shipped into the Island nation of Nauru so canned and preserved foods are common. This simple meal comes together in a flash. And if you’ve never tried or haven’t had canned corned beef in a long time, give it a go! Pan seared and crispy, it’s an easy pantry staple and tasty, meaty treat.
Naptime tip: This is a great I’m-tired-and-haven’t-grocery-shopped kind of meal.
Fried Egg and Corned Beef Rice Bowl
Serves 4
Ingredients:
2 cups rice
2 cups water
12 oz. can of corned beef
1 Tbs. olive or vegetable oil, if needed
4-8 eggs (1-2 per person)
Salt and Pepper
Method:
Combine dry rice and water in rice cooker and press start (or cook on stovetop as desired).
When rice has about 5 minutes remaining, slice corned beef block into 8 thin slices and cook in dry, non-stick pan over medium-high heat. Fry 1 minute per side then transfer to a plate.
Pour oil into now empty pan, if needed to prevent eggs from sticking. Crack eggs into frying pan and cook on medium high heat, uncovered, for 2 minutes. Season with salt and pepper then cover and reduce heat to low. Cook 2-5 more minutes to set whites and achieve desired yolk firmness.
Scoop rice into 4 bowls, top with 2 slices of browned corned beef and eggs, and serve.
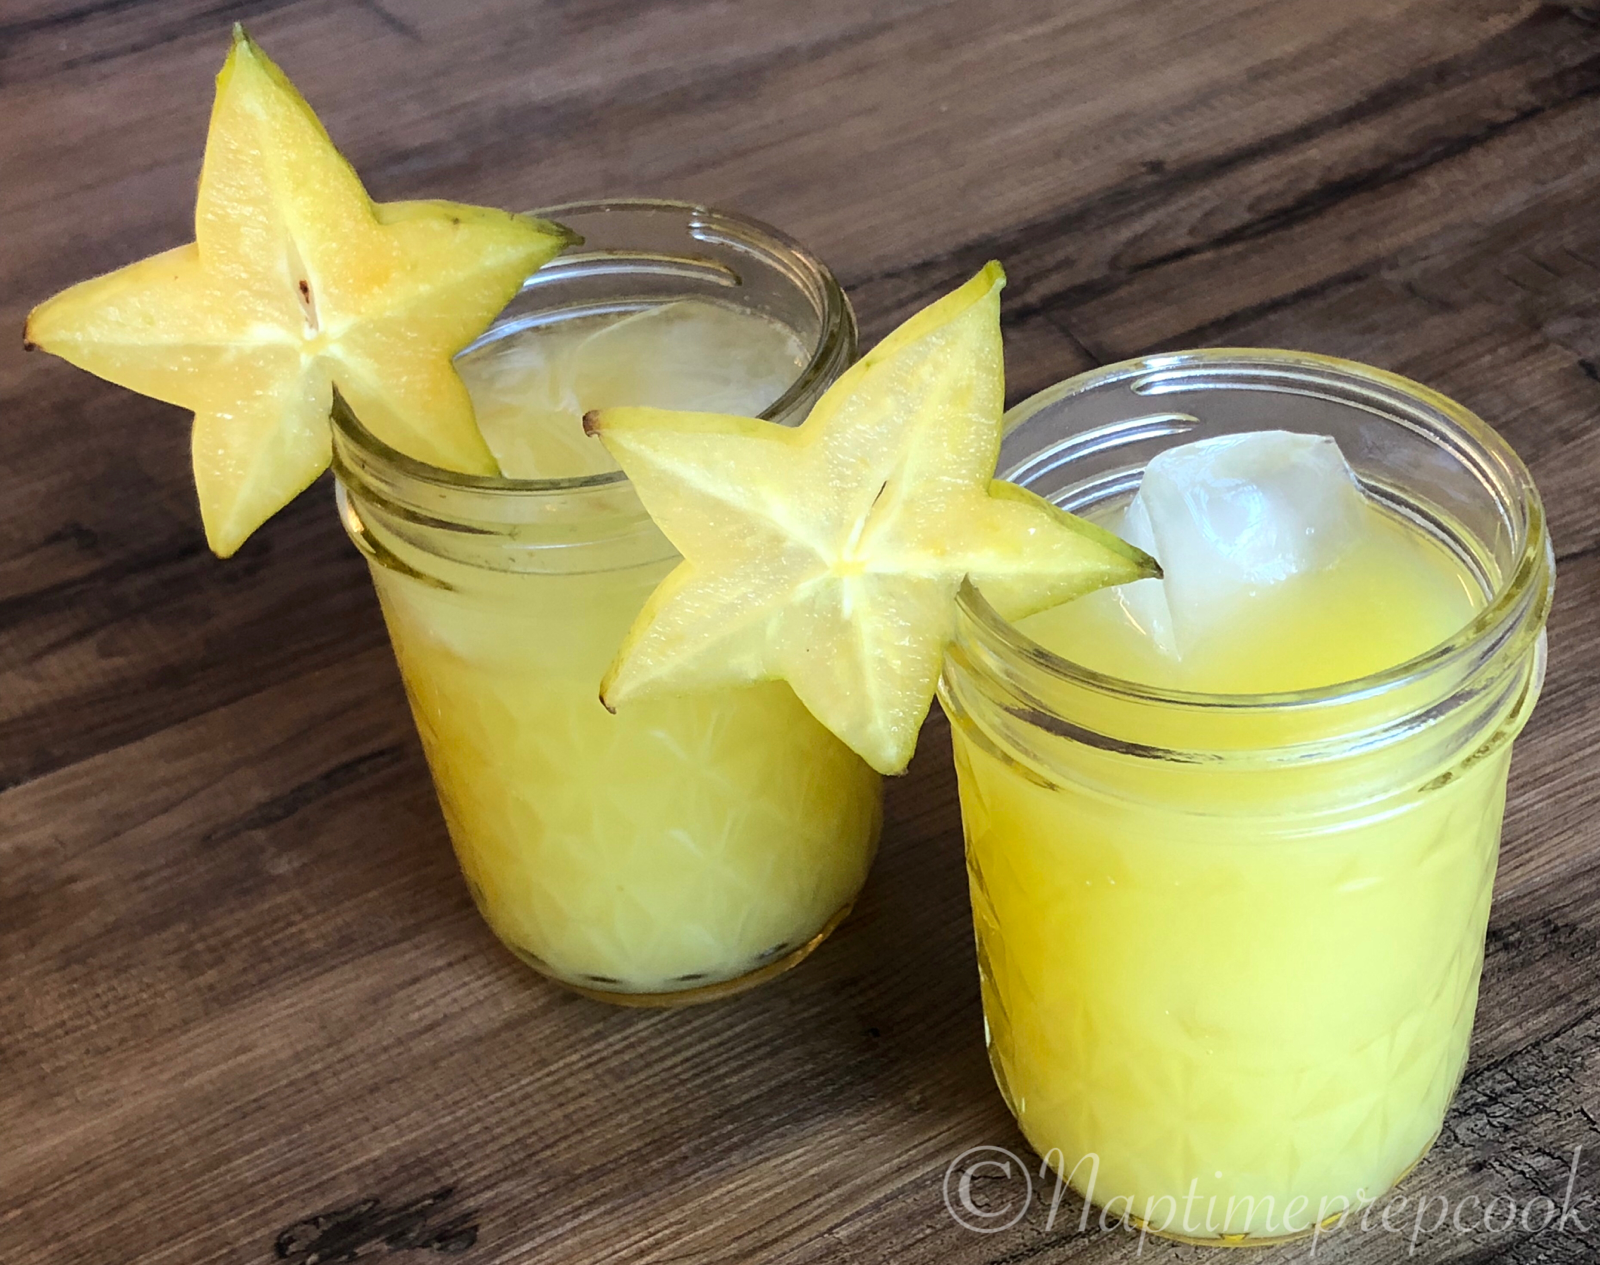
How cheerful is this drink?! I travelled to St. Kitts and Nevis as a teenager on vacation with my family. I loved that we had a chance to experience the culture on these beautiful islands for days, while the cruise shippers only glimpsed what they offered for a few hours.
One day we stumbled upon a church fundraiser offering hearty, home-cooked lunches and bottles of freshly made star fruit punch for a very modest price. Awesome local food supporting a good cause? Jackpot! We left thoroughly fed and perfectly refreshed. Such a great memory. The locals called the drink “star apple juice.” It is very similar to apple juice but with a distinctly tropical twist. I know you’ll enjoy this delightfully, unique drink!
Naptime Tip: August to October or December to February is typically the time you’ll find starfruit in stores in the US.
Starfruit Juice
Ingredients:
4-5 starfruits
1½ cup water
1/4-1/2 cup sugar, to taste
Ice, to serve
Method:
Wash your star fruits, trimming off and stems or bruises. Cut 1/2 of one fruit into slices for a garnish, if desired. Cut the remaining fruits into quarters and add to blender. Add the water and 1/4 cup of sugar then blend until smooth.
If you use a blender, place the fruit chunks with the water and sugar into the blender jar and blend smooth.
Strain through a fine mesh strainer into a pitcher. Taste, stirring in more sugar as needed. Chill, then pour into cups over ice, garnished with a starfruit slice. Enjoy! before pouring into glasses with ice cubes.
Halloween snacks for grown ups and kids alike. Some healthy choices and some not. Sweet, salty, savory, chewy, crunchy, yeah.
Black: Dark chocolate Oreos, black seedless grapes, beef jerky, blackberries, dark chocolate-covered pretzels, black olives, black mission figs, chocolate Pocky Sticks, black licorice, seasoned sunflower seeds.
Orange: Spicy queso Pop Corners, Cheese It crackers, sharp cheddar cheese, carrot sticks, dried apricots.
The cuisine of the Polynesian country of Tuvalu features an abundance of fresh fish and coconut. In fact, when making desserts, coconut milk is favored over animal milk. Here’s a simple but delicious coconut pudding, served right in the coconut shell. You can eat this creamy treat as is, or garnish with crispy, toasted coconut for added texture.
Naptimetip:You’ll need a hammer and Phillips head screwdriver tosplit your coconuts. This video Hereshows how to do it safely.Probably no tiny helpers for this job!
2 coconuts, drained and split (for serving, reserving water for another purpose)
1 cup shredded coconut (optional)
Method:
In a medium sized skillet set over medium-high heat, whisk together the coconut milk, sugar, corn starch and salt. Cook, whisking regularly, until mixture boils and thickens, it should take about 5 minutes.
Once thickened and smooth, transfer to a container to cool. Chill in the fridge at least 2 hours.
When ready to serve, toast the coconut in a dry pan over medium heat, tossing frequently, until golden and crispy. Remove from heat and transfer to a shallow bowl to cool.
Scoop the chilled pudding into the cut coconut halves and sprinkle with toasted coconut as desired. Enjoy!
In South Korea, bibimbap was traditionally eaten on the eve of the lunar new year as the people at that time felt that they had to get rid of all of the leftover side dishes before the new year. The solution to this problem was to put all of the leftovers in a bowl of rice and to mix them together. If that’s not Naptime-friendly, I don’t know what is!
And Bibimbap has got it GOING ON! Savory, tangy, creamy, spicy, crispy…it’s awesome! It’s traditional to stir all the toppings together before serving, but I prefer to do that table side so I can show off how pretty the little piles are. It’s like a painting!
Naptime Tip: The pickles, sauce and sautéed vegetables can all be made ahead. Just reheat the veg in the microwave before adding to the rice. Or totally top your rice with real-life leftover veg! It IS traditional!
For the pickles 1 cup cider vinegar 2 Tbs. sugar 1 ½ teaspoons salt 1 cucumber, peeled, quartered lengthwise, seeded, and sliced thin on bias 4 ounces (2 cups) bean sprouts
For the chile sauce ¼ cup gochujang 3 Tbs. water 2 Tbs. toasted sesame oil 2 tsp. sugar
For the rice 2½ cups short-grain white rice 2 ½ cups water ¾ teaspoon salt
For the vegetables ½ cup water 3 scallions, minced 3 Tbs. soy sauce 3 garlic cloves, minced or grated 1 Tbs. sugar 1 Tbs. vegetable oil 3 carrots, peeled and shredded (2 cups) 8 ounces shiitake mushrooms, stemmed, caps sliced thin 1 (10-ounce) bag curly-leaf spinach, stemmed and chopped coarse
For the bibimbap 2 Tbs. plus 2 tsp. vegetable oil 1 Tbs. toasted sesame oil 5-6 large eggs (1 per person)
Method-
For the pickles- Whisk vinegar, sugar, and salt together in medium bowl. Add cucumber and bean sprouts and toss to combine. Gently press on vegetables to submerge. Cover and refrigerate for at least 30 minutes or up to 24 hours.
For the chile sauce- Whisk gochujang, water, oil, and sugar together in small bowl. Cover and set aside.
For the rice- Bring rice, water, and salt to boil in medium saucepan over high heat. Cover, reduce heat to low, and cook for 7 minutes. Remove rice from heat and let sit, covered, until tender, about 15 minutes.
For the vegetables- While rice cooks, stir together water, scallions, soy sauce, garlic, and sugar. Heat 1 teaspoon oil in Dutch oven over high heat until shimmering. Add carrots and stir until coated. Add 1/3 cup scallion mixture and cook, stirring frequently, until carrots are slightly softened and moisture has evaporated, 1 to 2 minutes. Using slotted spoon, transfer carrots to small bowl.
Heat 1 teaspoon oil in now-empty pot until shimmering. Add mushrooms and stir until coated with oil. Add 1/3 cup scallion mixture and cook, stirring frequently, until mushrooms are tender and moisture has evaporated, 3 to 4 minutes. Using slotted spoon, transfer mushrooms to second small bowl.
Heat remaining 1 teaspoon oil in now-empty pot until shimmering. Add spinach and remaining 1/3 cup scallion mixture and stir to coat spinach. Cook, stirring frequently, until spinach is completely wilted but still bright green, 1 to 2 minutes. Using slotted spoon, transfer spinach to third small bowl. Discard any remaining liquid and wipe out pot with paper towel.
For the bibimbap- Heat 2 tablespoons vegetable oil and sesame oil in now-empty pot over high heat until shimmering. Carefully add cooked rice and gently press into even layer. Cook, without stirring, until rice begins to form crust on bottom of pot, about 2 minutes. Using slotted spoon, transfer carrots, spinach, and mushrooms to pot and arrange in piles that cover surface of rice. Reduce heat to low.
While a crust forms, heat remaining 2 teaspoons vegetable oil in 10-inch nonstick skillet over low heat for 5 minutes. Crack eggs into small bowl. Pour eggs into skillet; cover and cook (about 2 minutes for runny yolks, 2½ minutes for soft but set yolks, and 3 minutes for firmly set yolks). Season with salt. Carefully top the vegetables and rice with the eggs. Drizzle over a little sauce then present your masterpiece to the table!
To serve, without disturbing the bottom crust, use a wooden spoon to stir the rice, vegetables, and eggs until combined. Then scoop out portions, making sure everyone gets some crispy crust. Top with pickles and more sauce as desired. Enjoy!