Halloween snacks for grown ups and kids alike. Some healthy choices and some not. Sweet, salty, savory, chewy, crunchy, yeah.
Black: Dark chocolate Oreos, black seedless grapes, beef jerky, blackberries, dark chocolate-covered pretzels, black olives, black mission figs, chocolate Pocky Sticks, black licorice, seasoned sunflower seeds.
Orange: Spicy queso Pop Corners, Cheese It crackers, sharp cheddar cheese, carrot sticks, dried apricots.
This is my mom’s cake recipe combined with my favorite frosting and it makes one tasty cupcake. See?
My mom’s recipe is called Yum Yum Cake. Goofy name, yes, but it has a perfectly light texture and is super quick to make. Top that with a not-too-sweet, but very chocolatey frosting…oh, it’s dreamy. Try it! You’ll see.
Yum Yum cake
Makes 24 cupcakes or 48 minis
1 cup butter (2 sticks)
1/4 cup cocoa powder
1 cup water
2 cups flour
1 1/2 cups sugar
1 tsp. Baking soda
1/2 cup buttermilk (or 1/2 tsp. White vinegar stirred into 1/2 cup milk)
2 eggs
1 tsp. Vanilla
1/4 tsp. Salt
Method:
Preheat oven to 350°F. Place 24 cupcake papers into your cupcake tins or simply grease your cupcake pan.
Heat the butter, cocoa powder and water in a saucepan over medium heat until melted.
Stir together flour, sugar and baking soda in a mixing bowl (or better yet, use a large 8 cup liquid measuring cup). Whisk in the hot cocoa mixture. Add the buttermilk, eggs, vanilla and salt. Whisk to combine. Batter will be thin.
If your bowl does not have a spout, pour into a pitcher for easier distribution into the cupcake papers. Pour batter into lined cupcake tin, filling each cup 2/3 to 3/4 full.
Bake for 10-15 minutes or until a toothpick inserted comes out clean. Remove from pan and cool on a rack. Frost when cooled.
Chocolate Cream Cheese Frosting
Ingredients:
8 oz. cream cheese, softened
1 1/2 cups chocolate chips (milk chocolate or semisweet)
1 to 1 1/2 cups powdered sugar
2 Tbs. cocoa powder
1/2 tsp. Vanilla
A dash of salt
Method:
Measure chocolate chips into a bowl and zap in the microwave for 2 minutes or until melted. Beat in the softened cream cheese until smooth. Add the powdered sugar (start with 1 cup, add more as desired) and the cocoa powder, mix until incorporated. Add vanilla and salt. Stir to combine. Scoop into piping bag and pipe onto cooled cupcakes.
Crème brûlée is one of my most favorite desserts. It’s a fancy restaurant standby because they (or you) can make the custard hours or even several days in advance, then brûlée it to order. Unfortunately, some restaurants botch their crème brûlées or worse, fake them with a weird pudding mix. Fortunately, I’ve discovered Alton Brown’s recipe which turns out perfect, every time.
*Naptime tip: This is a make ahead dessert! So make the custards during an early nap and they’ll be chilled and ready to torch by dinner time.
P.S. Skip the wimpy kitchen torches and buy a REAL propane torch from the hardware store. They’re not too pricy and last 10x longer!
Fresh berries are the perfect compliment to this rich dessert
Place the cream, vanilla bean and its pulp into a medium saucepan set over medium-high heat and bring to a boil. Remove from the heat, cover and allow to steep for 15 minutes. Remove the vanilla bean.
While cream is steeping, whisk together 1/2 cup sugar and the egg yolks in a medium bowl until well blended and it just starts to lighten in color. Add the cream a little at a time, stirring continually. Pour the liquid into six 8-ounce ramekins. Place the ramekins into a large cake pan or roasting pan. Place pan in oven and pour enough hot water into the pan to come halfway up the sides of the ramekins. Bake just until the creme brulee is just set, but still trembling in the center, approximately 40 to 45 minutes. Remove the ramekins from the roasting pan and refrigerate for at least 2 hours and up to 3 days.
When ready to serve, remove the crème brûlée from the refrigerator. Divide the remaining 1/2 cup sugar equally among the 6 dishes and shake to disperse evenly on top. Using a torch, melt the sugar to form a crispy top. Allow the top to cool for a minute or two. Serve with fresh berries. Enjoy!
It IS possible to temper chocolate chips! And tempering chocolate is not as hard as you think. I made these for a Relief Society activity where I was demo’ing truffles. They were delicious! And the flavor combos are endless! *Naptime tip: Make the ganache and prep your toppings during one nap and then temper and dip during another for stress-free chocolatiering!
Classic cocoa, pecan, cherry with sprinkles, Himalayan pink salt, plain milk chocolate, cayenne, mint with crushed candycane
Chocolate Dipped Chocolate Truffles(Adapted from Cook’s Illustrated)
Ingredients
For the ganache:
8 oz. good quality dark or milk chocolate chips (Ghirardelli or Guittard recommended)
½ cup heavy cream
2 Tbs. butter
1 Tbs. corn syrup
*Optional ¼-½ tsp. extract or up to 2 tsp. of other flavoring (juice, oil, spices, etc.)
For the tempered chocolate coating:
10 oz. chocolate chips
2 oz. tempered chocolate bar, broken into 1 oz. pieces
Place a metal bowl over a pot containing about 2 inches of simmering water. Melt chocolate chips in bowl set over low to med-low heat, stirring often until melted. Place heavy cream, butter and corn syrup into a microwave-safe bowl and heat on high for 30-60 seconds until cream is hot and butter is melted. Whisk cream mixture to thoroughly combine. Add extract/flavoring if using. Once chocolate chips are melted, remove bowl from double boiler and whisk in the cream mixture until shiny and smooth. Cover and refrigerate for at least 2 hours (or overnight) until ganache is set.
When ready to dip, remove set ganache from fridge and scoop tablespoon-sized balls onto waxed paper-lined tray or cooling rack. Quickly roll each ball of ganache in your hands to create a uniform shape.
Chill the balls in the freezer for 10-15 minutes (or up to overnight in the fridge). Prep and assemble truffle toppings.
While ganache balls are chilling, make the tempered chocolate coating. Slowly melt the 10 oz. of chocolate chips in a metal bowl set over a pot with 2 inches of barely simmering water. Using an instant-read thermometer, heat chocolate chips to 120 degrees F (115 for milk and white chocolate) stirring often, then remove from heat. Remaining chips will melt as you continue to stir off-heat. Stirring constantly, cool the chocolate down to 100 degrees F. Add 2 pieces of tempered chocolate bar to “seed” the chocolate. Keep stirring until chocolate registers 90 degrees. Chocolate is now in temper.
Remove ganache balls from freezer. Toss one ball at a time into the tempered chocolate, rolling it around with a fork to coat it completely. Lift the truffle out of the chocolate and tap the fork on the bowl to remove excess coating. Scrape the fork off on the edge of the bowl then lower the truffle onto the waxed paper, using a toothpick to push truffle off the fork. Sprinkle with desired topping or roll in cocoa powder (gently shaking off excess cocoa after coating is set). **Make sure your tempered chocolate stays between 90 and 80 degrees!** Continue dipping until all ganache balls have been coated. If tempered chocolate drops to 80 degrees, re-warm gently over double boiler until chocolate just reaches 90 degrees. Once the tempered coating has set, truffles are ready to serve. Store finished truffles in the fridge for up to a week. Enjoy!
*Tips*
– Make sure no water gets into your chocolate while it’s melting or it will seize up!
– Depending on the amount of liquid flavoring added, you may need to decrease amount of cream slightly.
– Return ganache balls to the freezer if they start getting too soft to dip.
-It’s ok if chocolate is heated above 120, just be very careful not to burn it.
– Check the temperature of the tempered chocolate often to keep it between 90 and 80 degrees.
– Use a heating pad under your bowl to keep chocolate in temper.
-If tempered chocolate dips below 80, re-warm it up to 120, re-seed with another ounce of tempered chocolate and bring it back down to 90, stirring constantly.
– break or cut off hardened chocolate “foot” of truffle for a neater presentation.
– If tempered chocolate doesn’t harden, serve truffles cold 😊<<<
I got a lot of compliments on these fun, summery cupcakes when I brought them to a multi-ward luau. It’s lemon cupcake, with a tangy lemon curd filling, strawberry buttercream and fruit roll up decoration! I blitzed some freeze dried strawberries in my spice grinder to give the frosting a real fruit flavor without any added moisture.
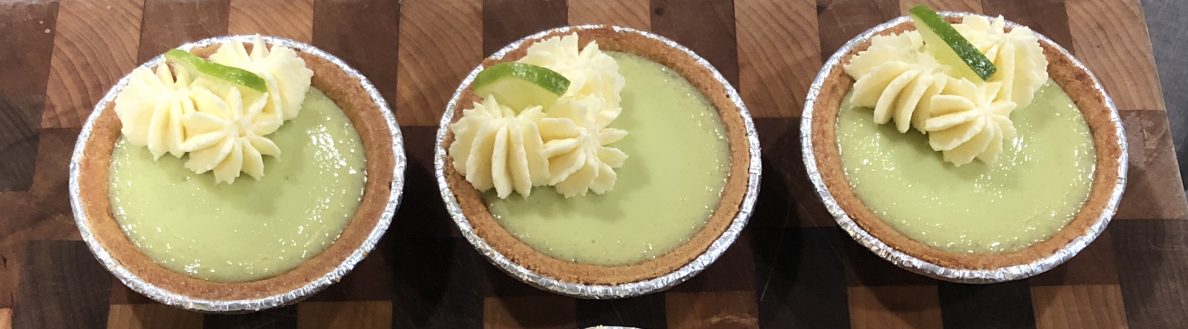
A nod to my sunny California days. I made a curd with grapefruits from my friend’s tree! I added corn starch to solidify the microwave curd, poured it into a homemade graham cracker crust and topped it with an almond-flavored whipped cream and candied grapefruit peel. It was light, fresh and fantastic!
Thanks to Trish from Mom on Time Out for the microwave curd I’ve used over and over again! It works with any citrus.
*Naptime tip: Candy the peels and whip the cream while they sleep, then put those little fingers to work on pressing the crust into the pan.
Eating outside in the winter in the Bay Area was the best!
For the curd:
Makes about 1 pint OR 2 cups
Ingredients
½ cup unsalted butter
1¼ cups granulated sugar
3 eggs
1 egg yolk
1 cup fresh citrus juice
zest from 3 lemons or limes or 1 grapefruit (candy the rest of the peels)
2 tsp. corn starch mixed with 2 tsp. water
Directions
Melt butter in microwave, set aside to cool slightly.
Whisk together sugar and eggs in a medium-sized microwave-safe bowl.
Whisk in grapefruit (or other citrus) juice and zest.
Finally whisk in the butter.
Microwave on 50% power for one minute. Stir.
Continue microwaving at 100% power in one minute intervals, stirring after each interval until the mixture is thick enough to coat the back of a spoon. (The curd will thicken as it cools.)
If using curd for pie, pour in corn starch slurry and whisk to combine.
Strain curd through a fine-mesh sieve to remove zest.
Pour curd into a jar for later use or directly into a pre-baked graham cracker crust.
Refrigerate for 2 hours or until set.
Serve cold with sweetened almond-flavored whipped cream and candied peel.
Panna cotta is Italian for creamy jello. Sort of. This one I made with cream, sugar, gelatin and vanilla bean. Served with a simple raspberry coulis and chocolate decoration. Super impressive looking, crazy easy and VERY naptime friendly.
2nd time making Macarons. These are chocolate cherry and chocolate orange.
Update: My daughter begged me for days to make macarons until I finally gave it. I ground up some pecans because I was out of almond meal and my piping was pitiful but they still tasted great! These were mauve-looking chocolate anise and blue honeyed goat cheese (Daughter chose the colors.)